
前言
博客美化相较搭建环境教程而言,更是多如牛毛,但通病就是不够细节,很多都是一笔带过。导致中间遇到很多问题,本教程是把我遇到的一些问题分享给大家。
其次做博客主要还是想输出一些有用的知识给大家参考,因此在美化博客方面主要以实用方面为主,不添加各种喧宾夺主的特效。如果喜欢布置美化自己博客的同学这里推荐一个医学大佬的博客,跟着全流程制作自己的博客,特效绝对让你满意。闲言少叙,进入正题。
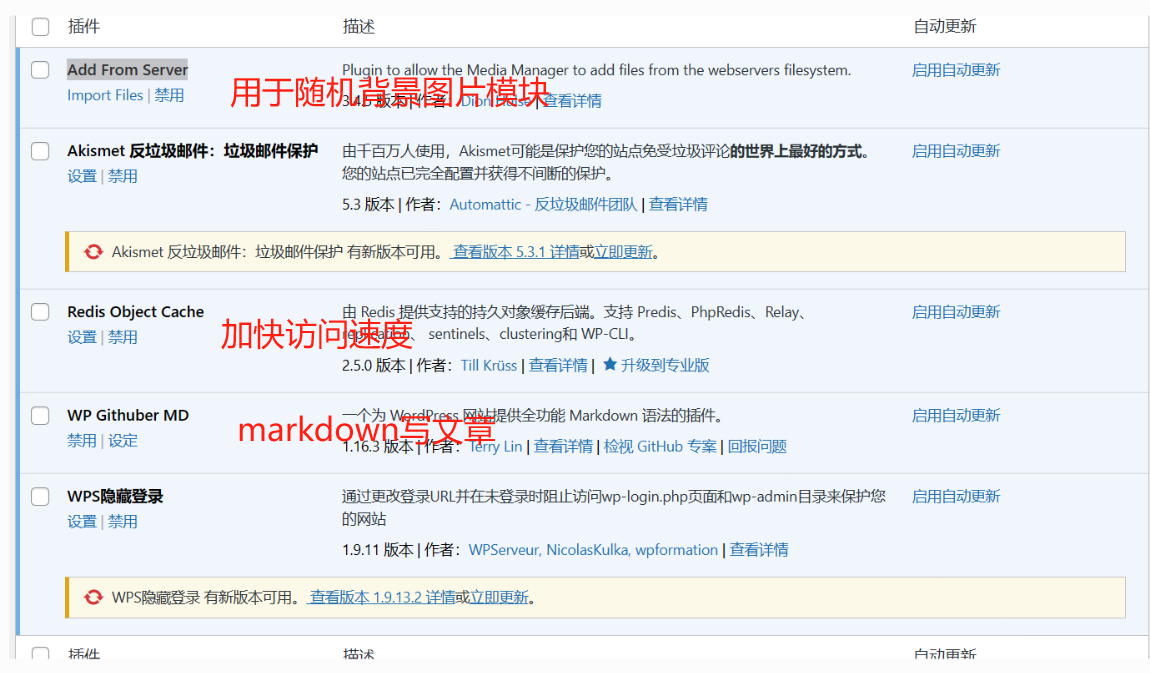
插件
插件是为wordpress提供一些额外的功能,这里我仅装载了5款插件。具体教程看医学大佬的博客,没啥值得说的,照做就行。
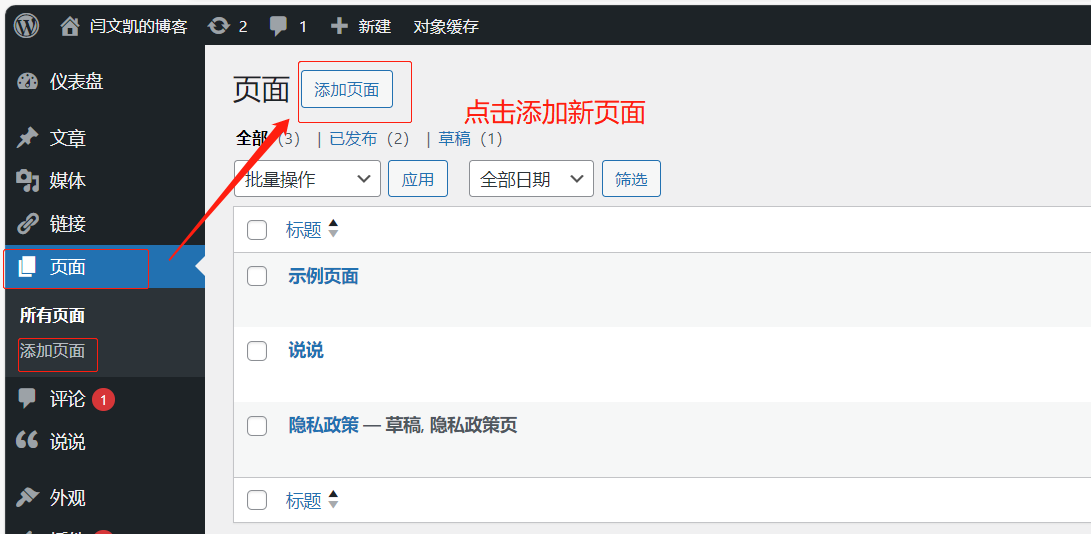
页面
我主要是为了使用说说,所以用了一下页面,没深入配置页面的效果,有想法的可以自行百度页面的美化。
1.创建页面
2.选择模板

3.添加美化代码
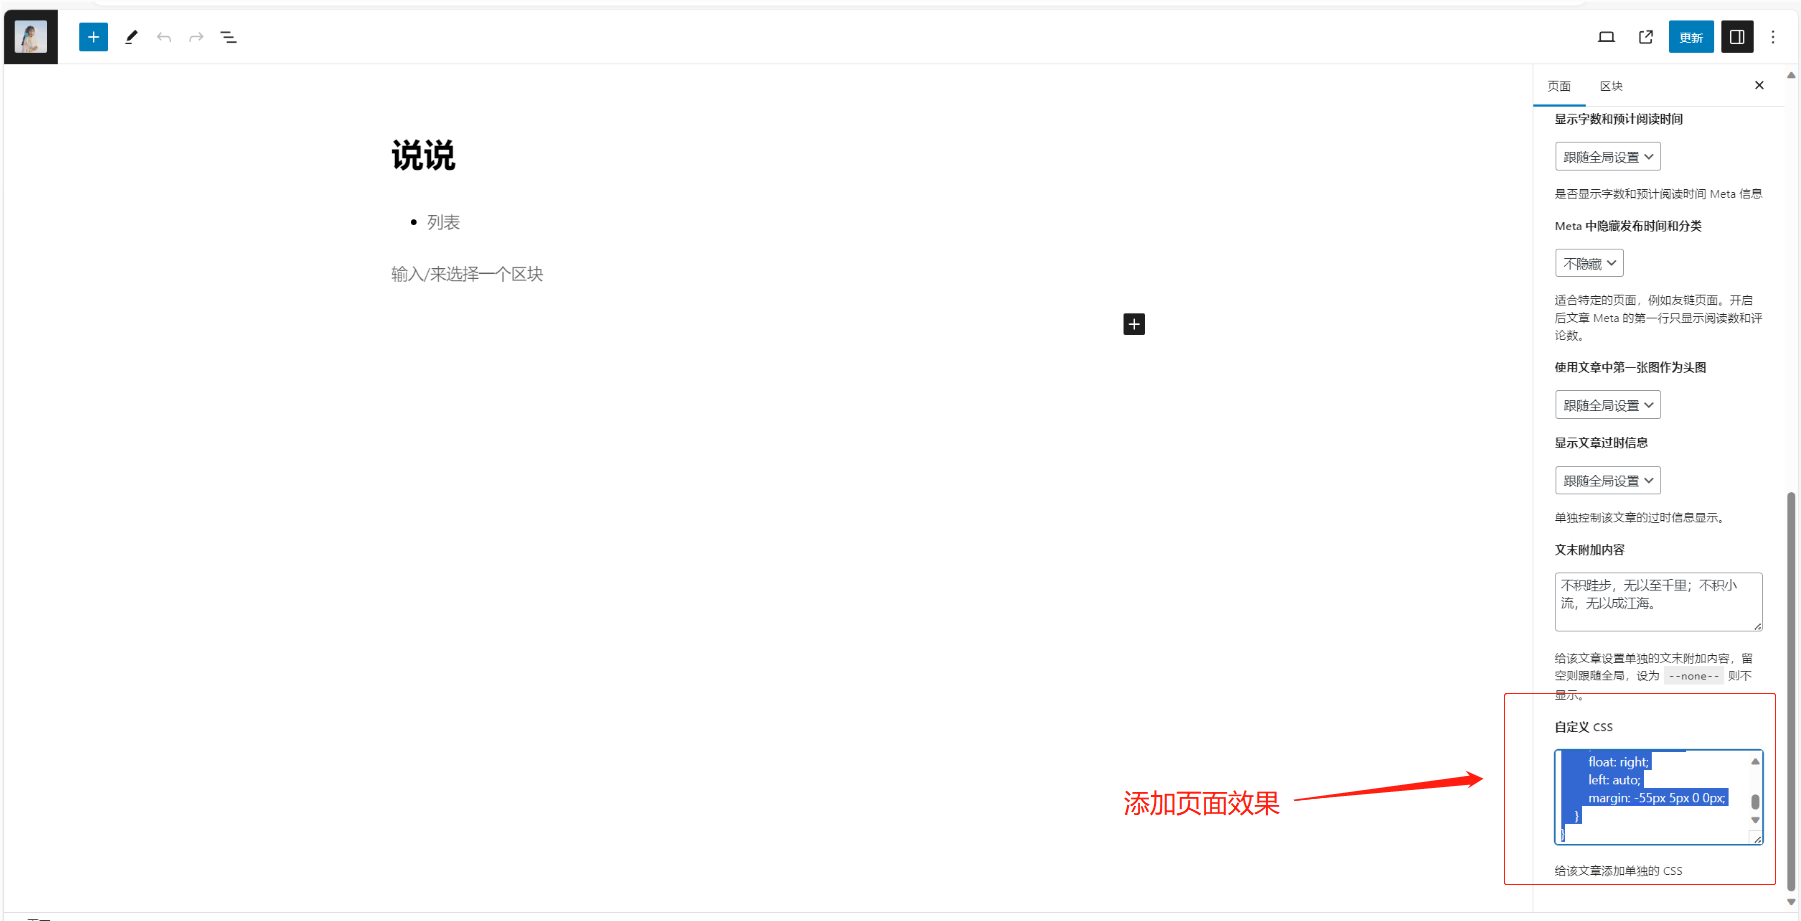
将下面的美化代码插入到自定义css中即可。
/** 垂直时间线CSS样式 */
.cbp\_tmtimeline {
margin: 30px 0 0 0;
padding: 0;
list-style: none;
position: relative;
}
/\* The line */
.cbp\_tmtimeline\:before {
content: '';
position: absolute;
top: 0;
bottom: 0;
width: 10px;
background: #afdcf8;
left: 20%;
margin-left: -6px;
}
/* The date/time */
.cbp\_tmtimeline > li .cbp\_tmtime {
display: block;
width: 30%;
padding-right: 100px;
position: absolute;
color: #AAA;
}
.cbp\_tmtimeline > li .cbp\_tmtime span {
display: block;
text-align: right;
}
.cbp\_tmtimeline > li .cbp\_tmtime span\:first-child {
font-size: 0.9em;
color: #bdd0db;
}
.cbp\_tmtimeline > li .cbp\_tmtime span\:last-child {
font-size: 2.9em;
color: #24a0f0;
}
.cbp\_tmtimeline > li\:nth-child(odd) .cbp\_tmtime span\:last-child {
color: #7878f0;
}
/* Right content */
.cbp\_tmtimeline > li .cbp\_tmlabel {
margin: 0 0 15px 25%;
background: #24a0f0;
color: #fff;
padding: 0.8em;
font-size: 1.2em;
font-weight: 300;
line-height: 1.4;
position: relative;
border-radius: 5px;
}
.cbp\_tmtimeline > li\:nth-child(odd) .cbp\_tmlabel {
background: #7878f0;
}
.cbp\_tmtimeline > li .cbp\_tmlabel h2 {
border-bottom: 0px;
border-top:1px dashed #FFF;
font-size:16px;
height: 24px;
padding: 5px 3px 12px;
margin:0px;
}
.cbp\_tmtimeline > li .cbp\_tmlabel h2 > span {
font-size: 12px;
float: right;
text-align: center;
line-height: 24px;
overflow: hidden;
text-overflow: ellipsis;
white-space: nowrap;
}
/* The triangle */
.cbp\_tmtimeline > li .cbp\_tmlabel\:after {
right: 100%;
border: solid transparent;
content: " ";
height: 0;
width: 0;
position: absolute;
pointer-events: none;
border-right-color: #24a0f0;
border-width: 10px;
top: 10px;
}
.cbp\_tmtimeline > li\:nth-child(odd) .cbp\_tmlabel\:after {
border-right-color: #7878f0;
}
/* The icons */
.cbp\_tmtimeline > li .cbp\_tmicon {
width: 48px;
height: 48px;
font-family: 'ecoico';
speak: none;
font-style: normal;
font-weight: normal;
font-variant: normal;
text-transform: none;
font-size: 48px;
line-height: 48px;
\-webkit-font-smoothing: antialiased;
position: relative;
color: #fff;
background: #46a4da;
border-radius: 50%;
box-shadow: 0 0 0 8px #afdcf8;
text-align: center;
left: 20%;
top: 0;
margin: 0 0 0 -25px;
}
.cbp\_tmtimeline > li .cbp\_tmicon >img {
border-radius: 50%;
position: absolute;
top: 0px;
left: 0px;
}
/* Example Media Queries \*/
@media screen and (max-width: 65.375em) {
.cbp\_tmtimeline > li .cbp\_tmtime span\:last-child {
font-size: 1.5em;
}
}
@media screen and (max-width: 47.2em) {
.cbp\_tmtimeline\:before {
display: none;
}
.cbp\_tmtimeline > li .cbp\_tmtime {
width: 100%;
position: relative;
padding: 0 0 20px 0;
}
.cbp\_tmtimeline > li .cbp\_tmtime span {
text-align: left;
}
.cbp\_tmtimeline > li .cbp\_tmlabel {
margin: 0 0 30px 0;
padding: 1em;
font-weight: 400;
font-size: 95%;
}
.cbp\_tmtimeline > li .cbp\_tmlabel\:after {
right: auto;
left: 20px;
border-right-color: transparent;
border-bottom-color: #24a0f0;
top: -20px;
}
.cbp\_tmtimeline > li\:nth-child(odd) .cbp\_tmlabel\:after {
border-right-color: transparent;
border-bottom-color: #7878f0;
}
.cbp\_tmtimeline > li .cbp\_tmicon {
position: relative;
float: right;
left: auto;
margin: -55px 5px 0 0px;
}
}
页脚
在页脚设置中添加特效,代码添加位置在argon主题选项中的页脚选项,或者外观中的footer.php中添加。最好是在argon主题选项中修改,这样更新主题不会导致特效消失,但此位置不支持php语言,导致下面的特效不识别,只能添加到footer.php中。
1.footer.php中添加代码
插入位置:
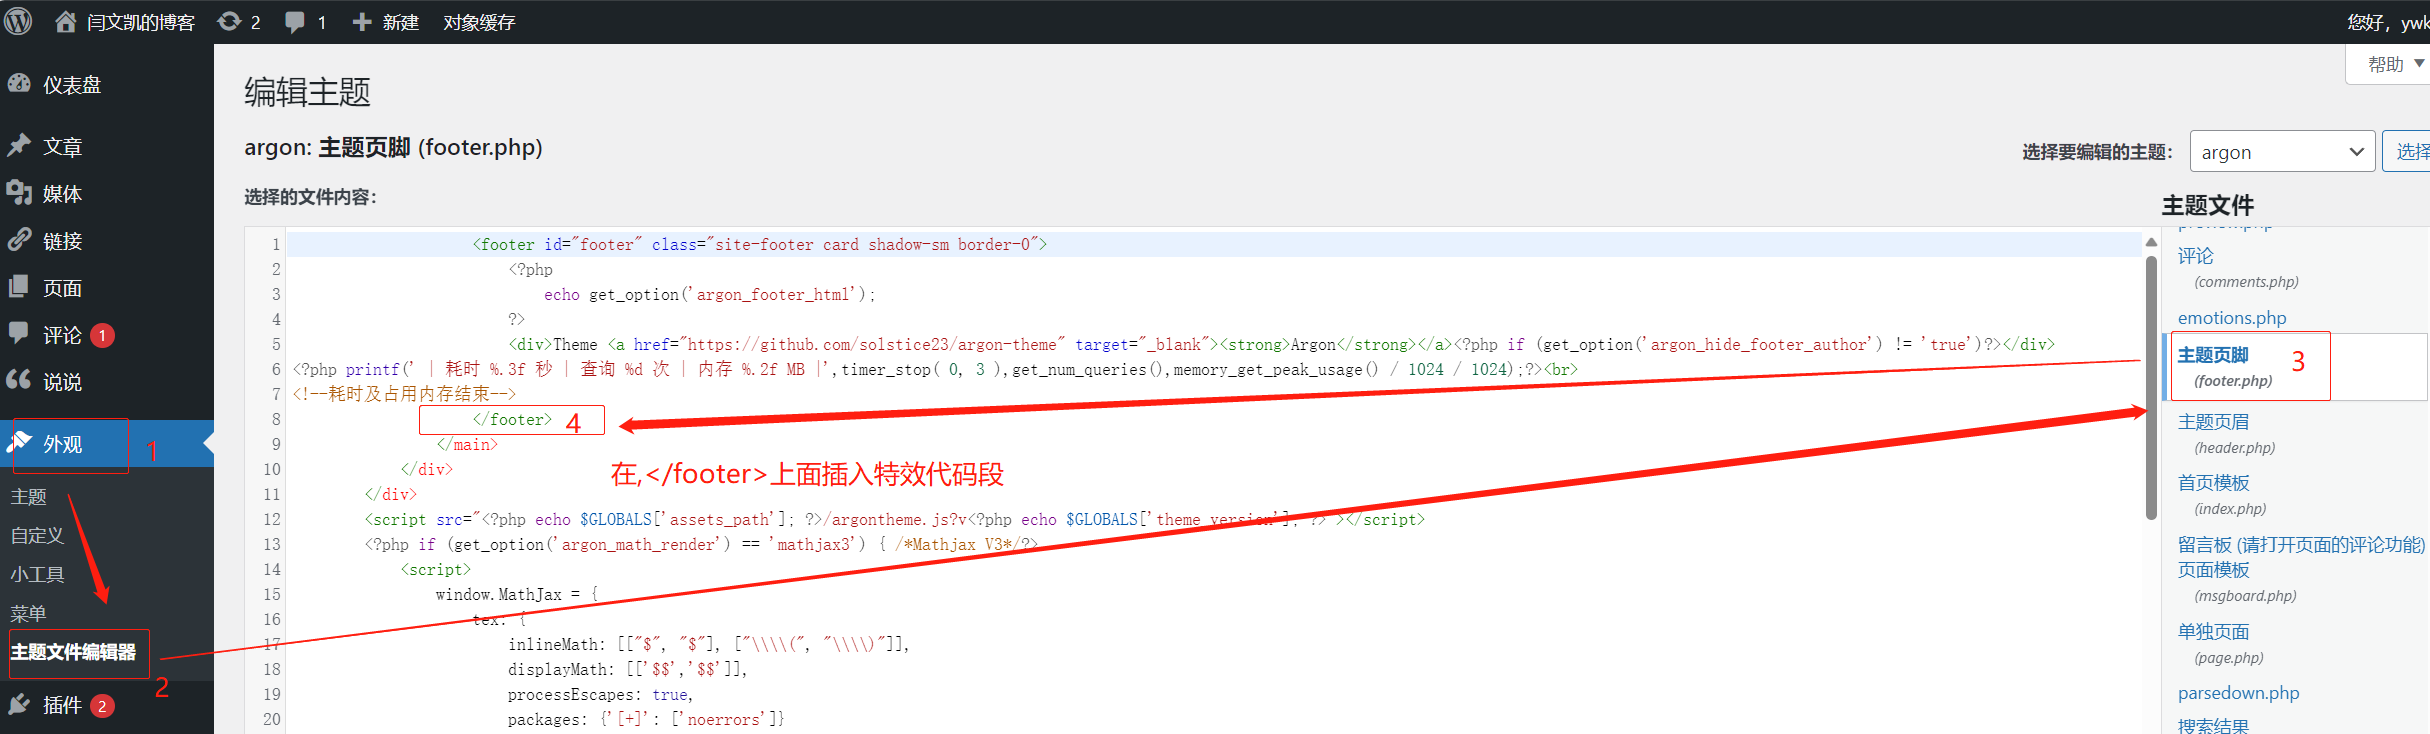
这段是博客底部的耗时、查询次数、占用内存的特效。
2.在主题选项中添加代码
插入位置:
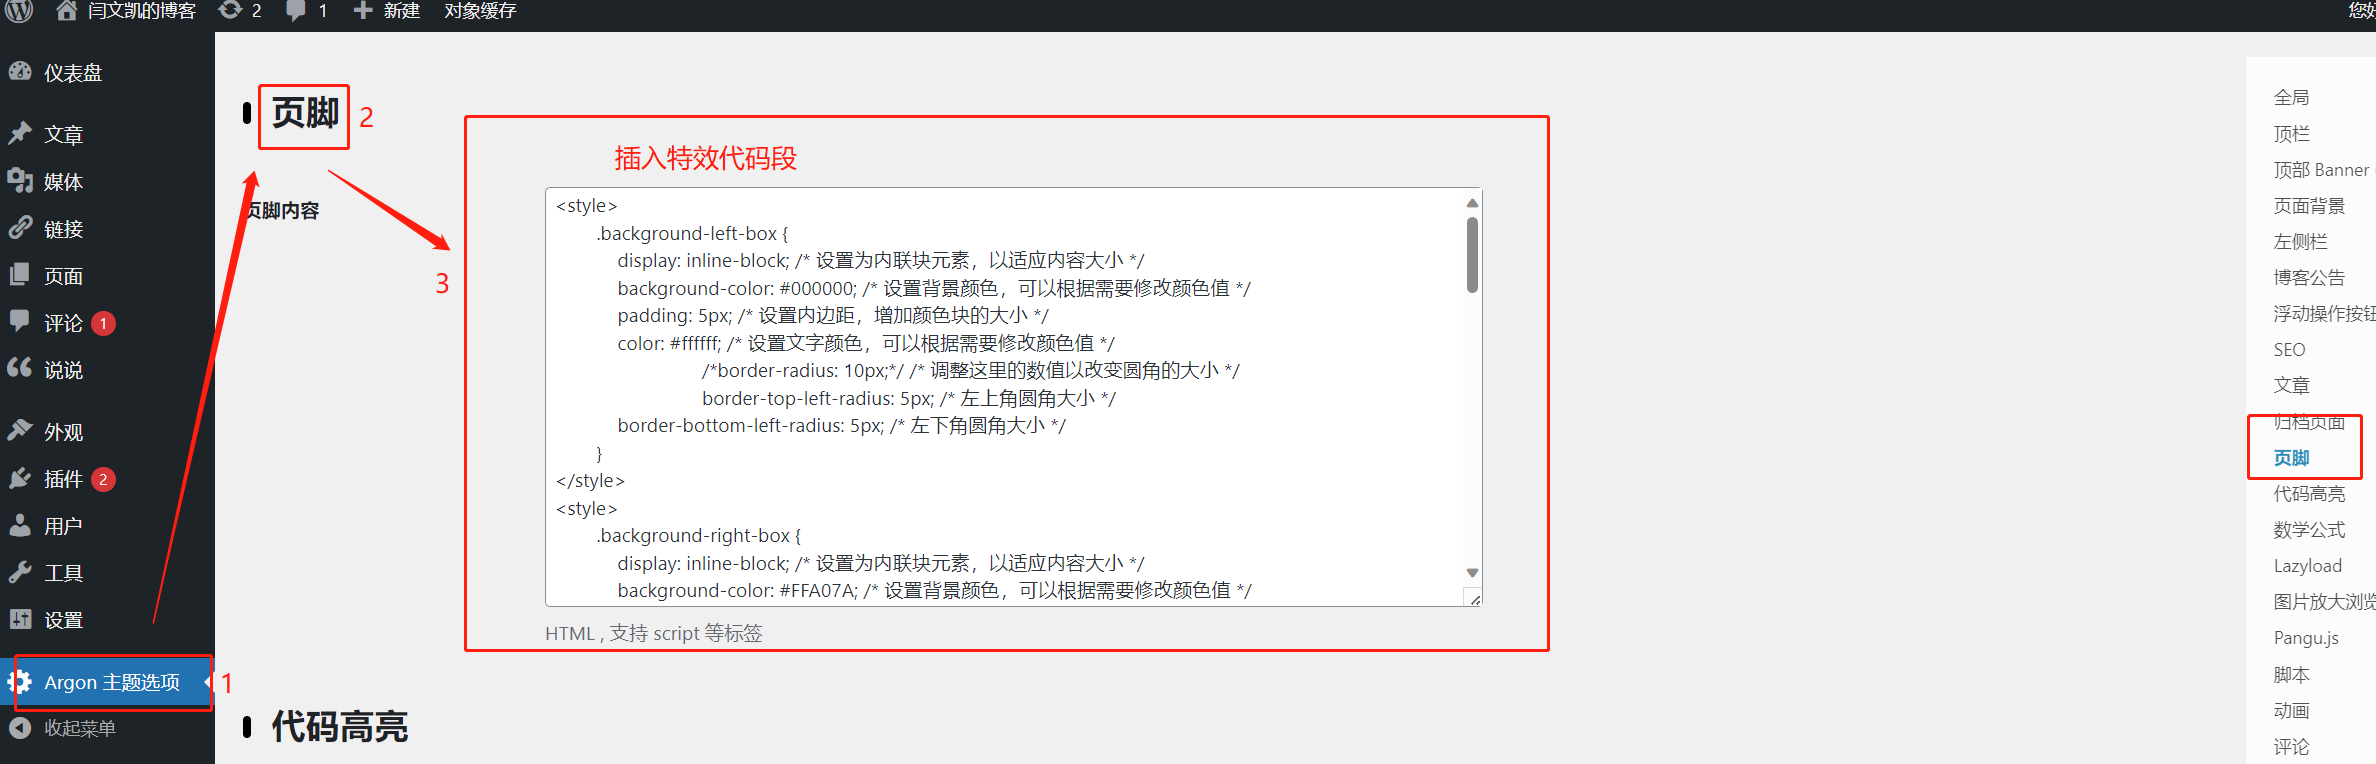
这段代码是备案号显示、备案号背景色块及色块形状、建站时间、颜色变化特效的代码。
随机静态壁纸
随机静态壁纸每次刷新都能更换不一样的背景。这会让自己的博客充满新鲜感,但又不用经常更新什么东西,省力又有大作用,所以一定要搞。
1.建立图库文件夹
首先在/var/www/html/下建立imge文件夹,并创建下面几个文件。

各个文件的作用
 ls -lh
-rwxr-xr-x 1 www-data www-data    0 Jan 10 21:09 img_mobile.txt(手机壁纸链接)
-rwxr-xr-x 1 www-data www-data  138 Jan 19 14:39 img.txt(PC壁纸链接)
-rwxr-xr-x 1 www-data www-data 1.3K Jan 10 21:11 index.php(随机图API)
-rwxr-xr-x 1 www-data www-data  80K Jan 10 21:05 Mobile_Detect.php(设备判断)
2.添加pc端壁纸链接
vim /var/www/html/imgapi/img.txt添加图片链接
https://s2.loli.net/2024/01/25/cUAeYGSBplEfzRT.jpg
https://gitee.com/yanwenkai1/picgo_img/raw/master/tc-1.jpg
3.随机API
vim /var/www/html/imgapi/index.php添加随机API的代码
isTablet()) {
        // 平板定义为PC类
        return false;
    } elseif ($MobileDetect->isMobile()) {
        return true;
    } else {
        return false;
    }
}

// 电脑与手机用不同的壁纸
if(is\_mobile()){
// 手机壁纸
`$filename = "img_mobile.txt";
}else{
   // 电脑壁纸
   $`filename = "img.txt";
}

//存放api随机图链接的文件名img.txt
if(!file\_exists(\$filename)){
die('文件不存在');
}

//从文本获取链接
`$pics = [];
$fs = fopen($filename, "r");
while(!feof($`fs)){
$line=trim(fgets($fs));
if($line!='' && substr($str , 0 , 1) != '#'){
array\_push($pics, $line);
}
}

// 从数组随机获取链接
// $pic = $pics\[array\_rand(`$pics)];
$pic = $pics[random_int(0, count($`pics) - 1)]; # 真随机

//返回指定格式
$type=$\_GET\['type'];
switch(\$type){

//JSON返回
case 'json':
header('Content-type\:text/json');
die(json\_encode(\['pic'=>\$pic]));

default:
die(header("Location: \$pic"));
}
?>
4.配置判断终端功能
vim /var/www/html/imgapi/Mobile_Detect.php 在Mobile_Detect.php文件中填充下面的代码。太长放到gitee上了附上链接。
5.赋予权限
sudo chown -R www-data:www-data /var/www/html/imgapi
sudo chmod -R 755 /var/www/html/imgapi
6.验证API是否生效
在浏览器上输入"https\://<博客域名>/imgapi/img.txt",网页显示自己填写的图片url即表示成功。
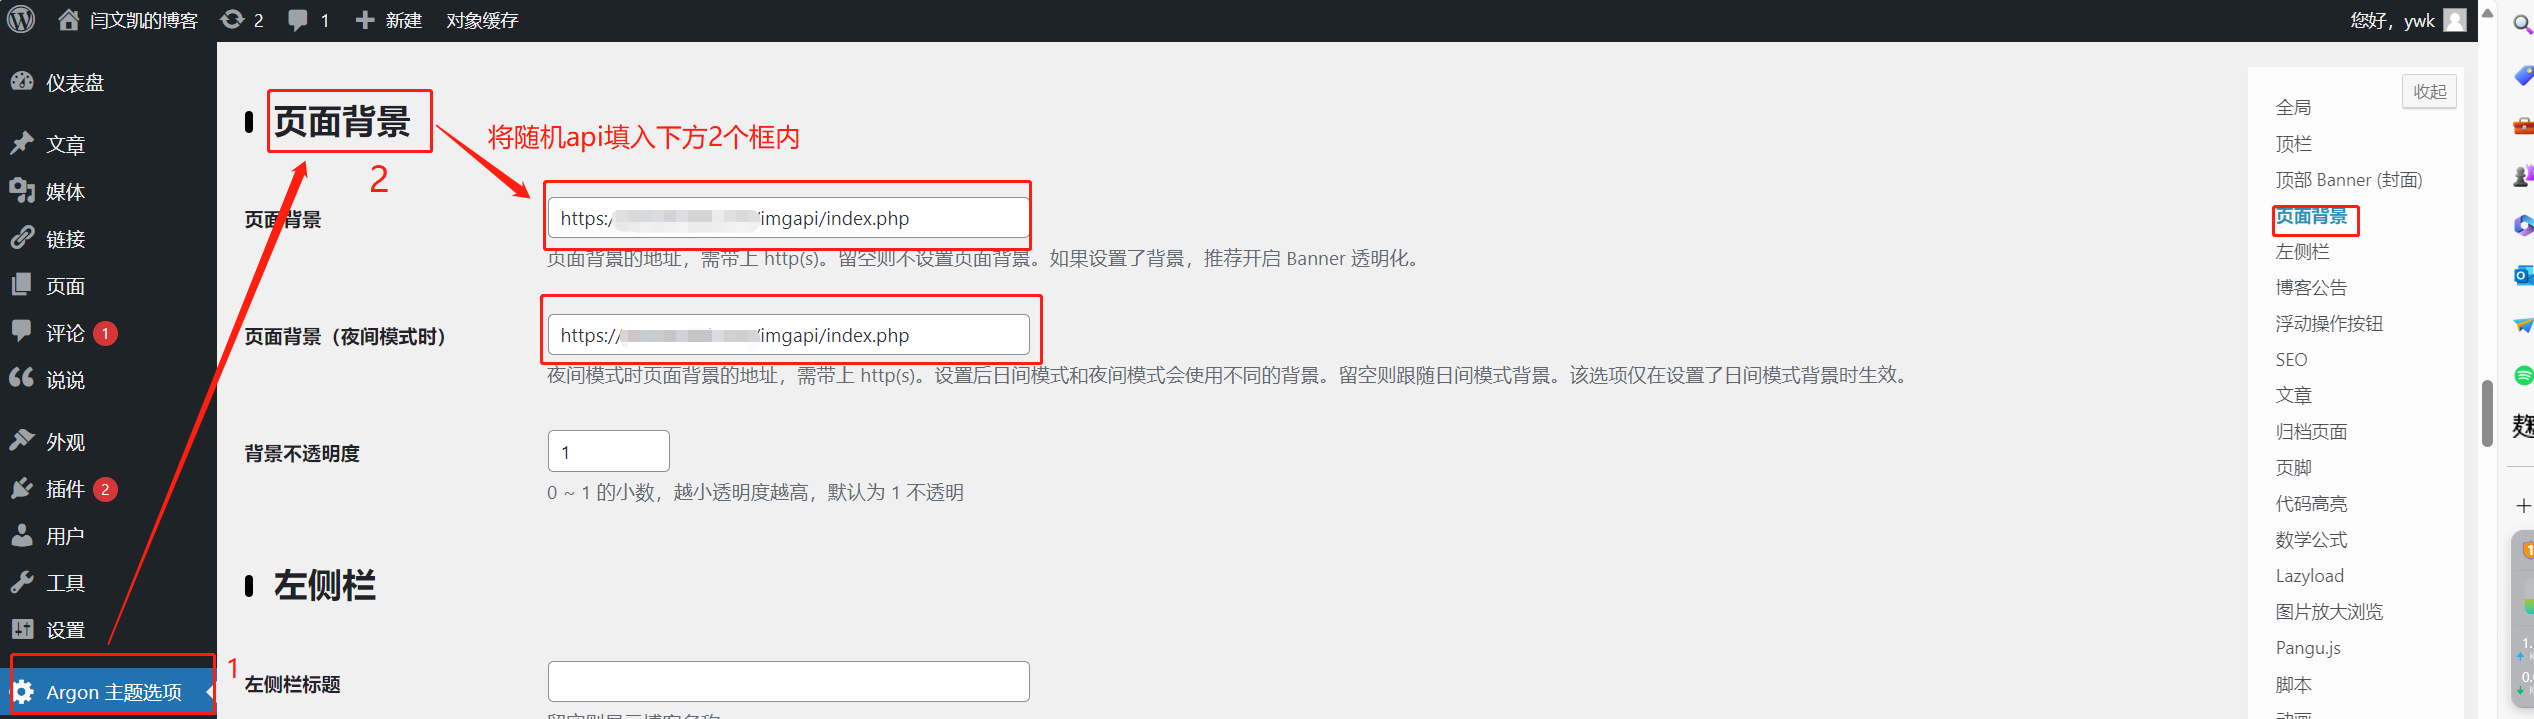
7.将API插入wordpress中
将这个"https\://<博客域名>/imgapi/index.php"当作图片的url填入主题设置里页面背景中即可。
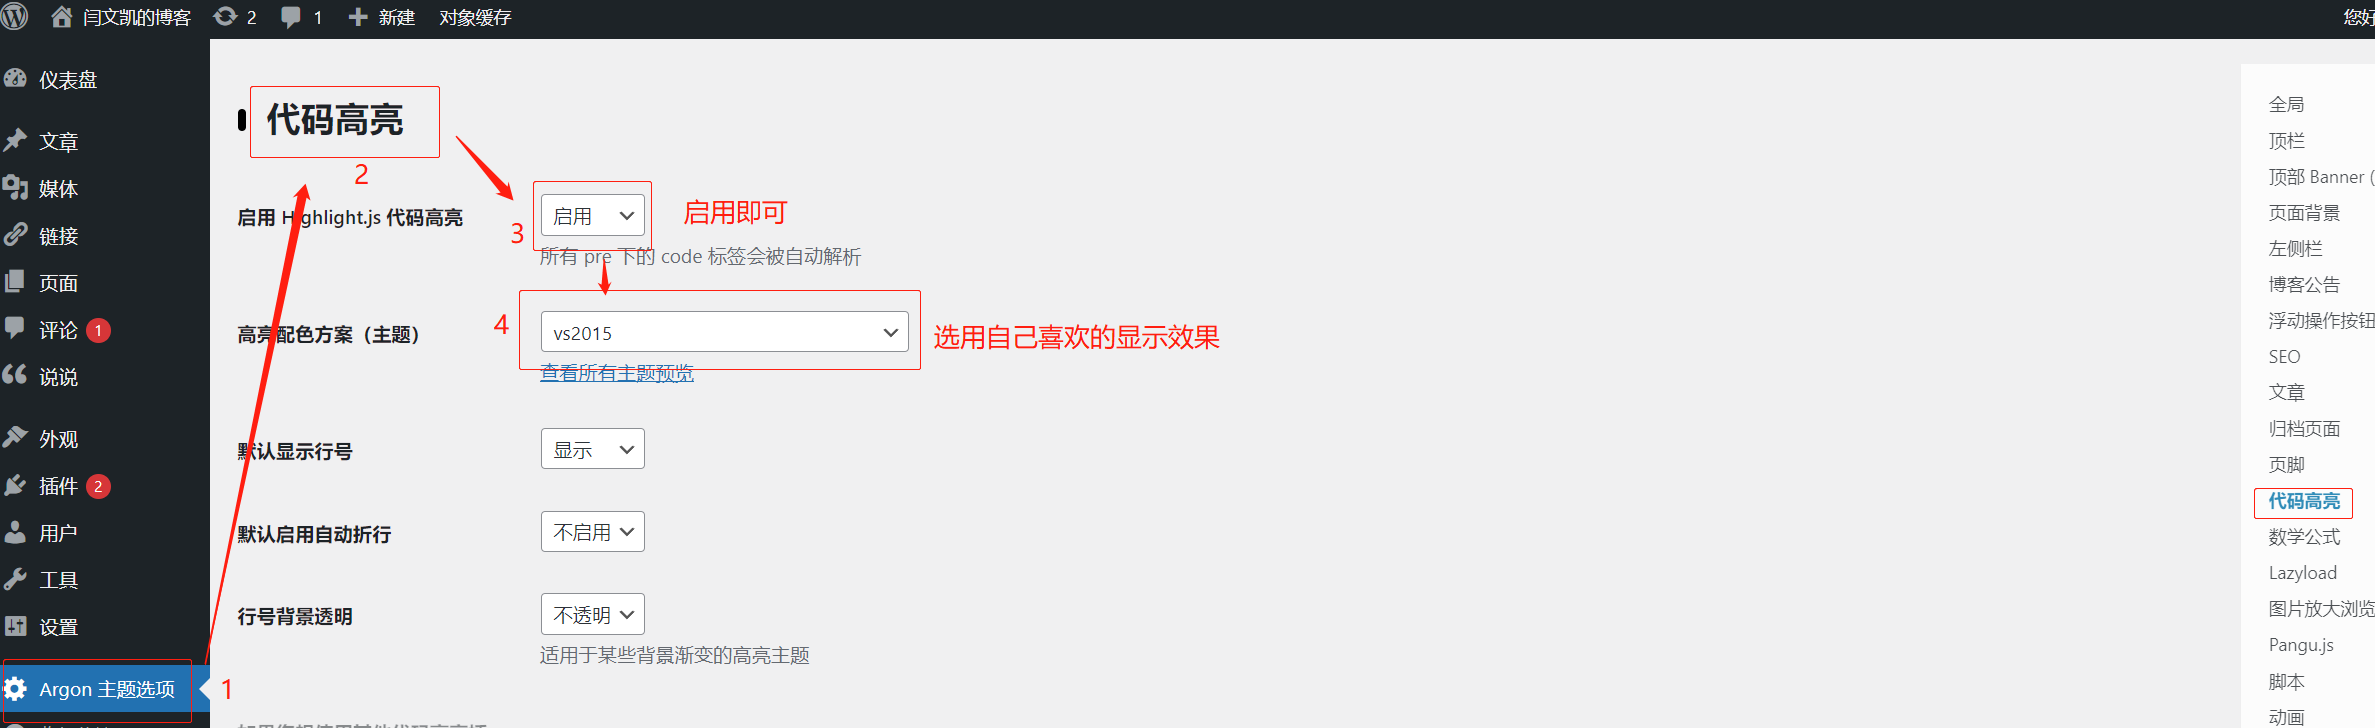
代码块
博客里的代码块显示就是argon主题选项中的代码高亮,开始不了解,以为是啥插件或者css代码,查了半天,后来才发现就是主题里的一个小设置。而且百度查找的各种插件效果也没有官方的好看,所以我直接就用默认风格代码块。自己设置时效果自己选一个钟意的即可。
使用markdown写文章时插入代码方式如下:

图标
图标也是,在想要插入图标的文字前面插入代码即可。推荐使用官方内置的apapche图标库。
1.搜素喜欢的图标
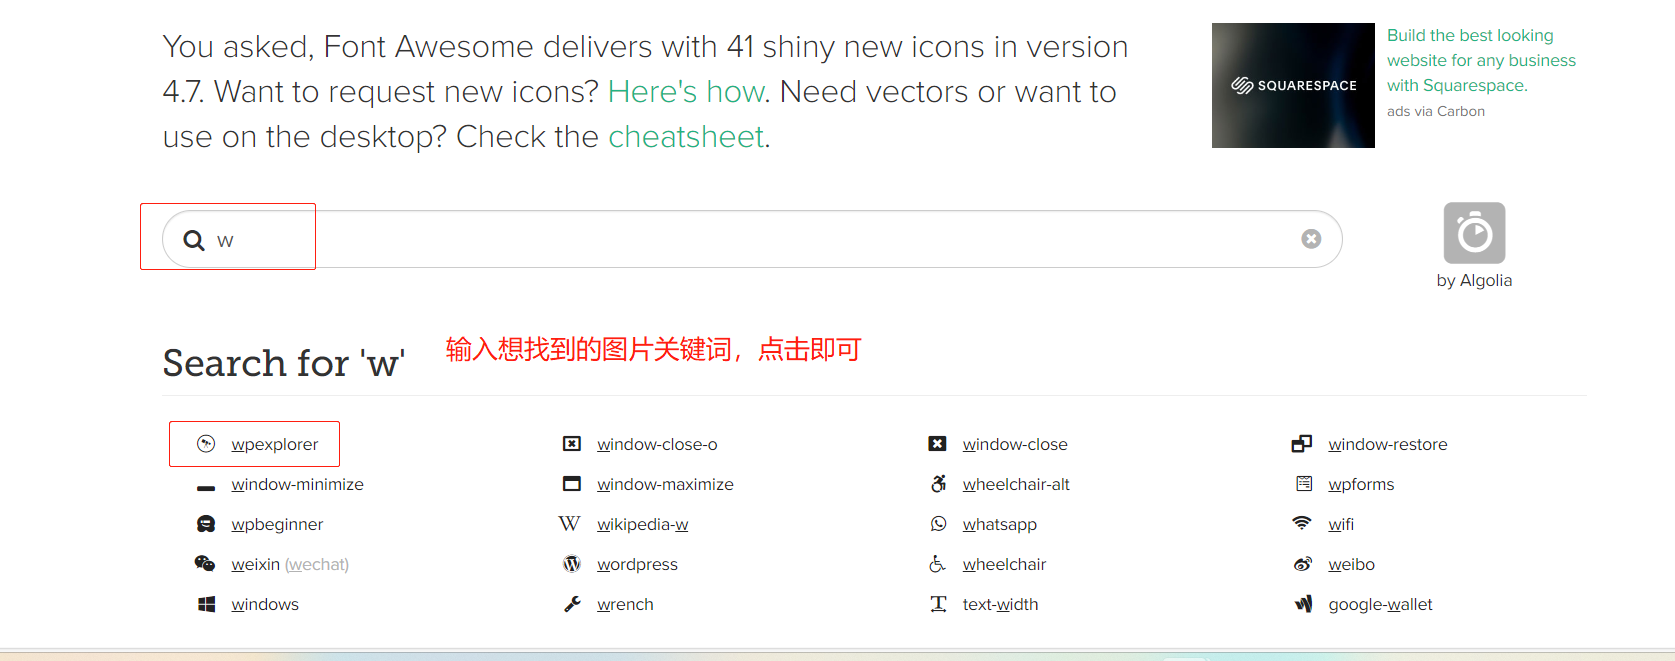
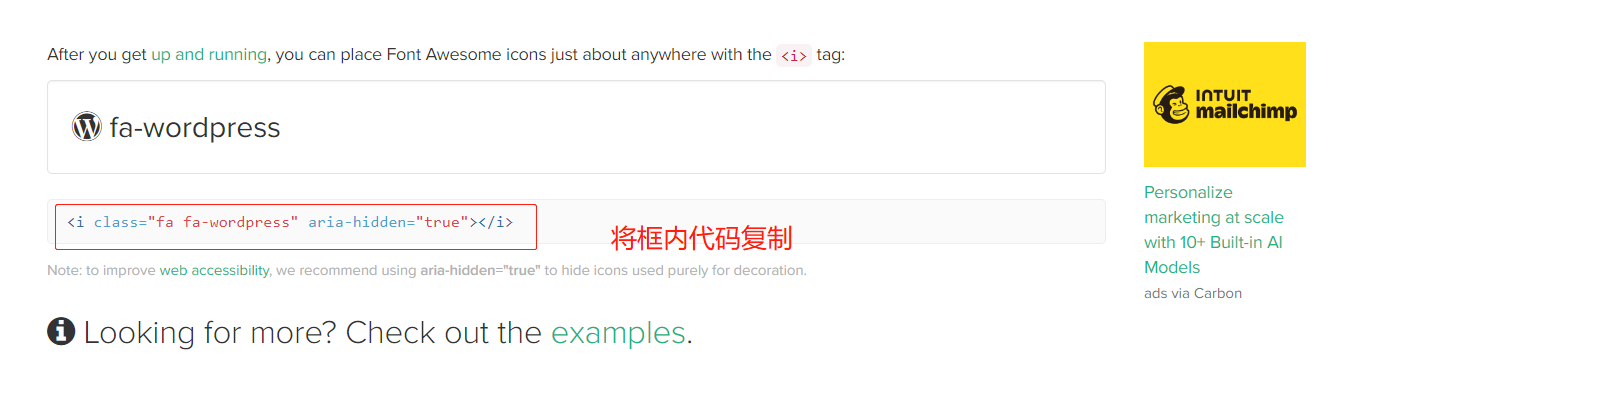
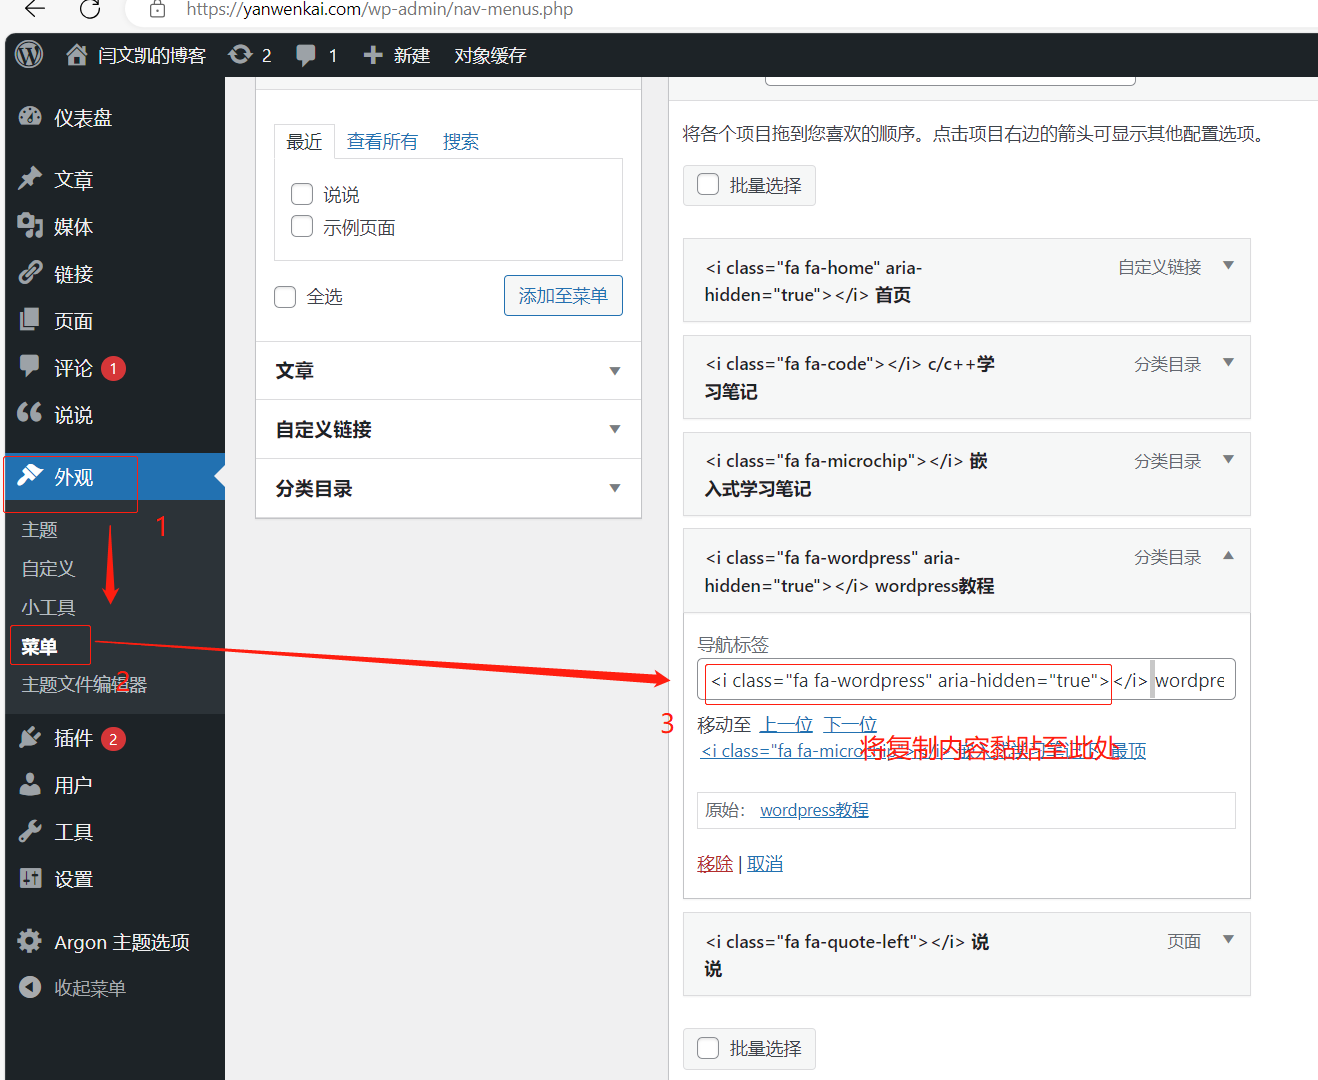
2.将复制的图标代码填至标签前
这里建议图标代码和标签文字间加个空格,这样更好看。
3.效果如下

搜索栏图标
经常使用浏览器的同学都知道,一般各种应用在浏览器的标签上都有自己专属的图标,效果是方便用户更快的找到对应的标签页,增加自己应用的辨识度;作为个人来说最大的目的就是增加辨识度显得自己的网页更专业。

首先找到一个自己最喜欢的图片,然后将图片转换成ico格式,格式转换工具百度一搜全是免费的。然后上传到自己可以存放图片的图床机器下;这里我放到了我的网页目录下,因为我的chevereto图床不支持存放ico格式的图片。
/var/www/自己的图片目录/xxx.ico将下面的代码插入到如下位置,即可生效。
<link href="https://自己的图床目录/tittle.ico" rel="shortcut icon" />

最后的效果如下,这个图标在后台页面时不生效,不过后台页面只有我一个人用,倒也不是啥问题。

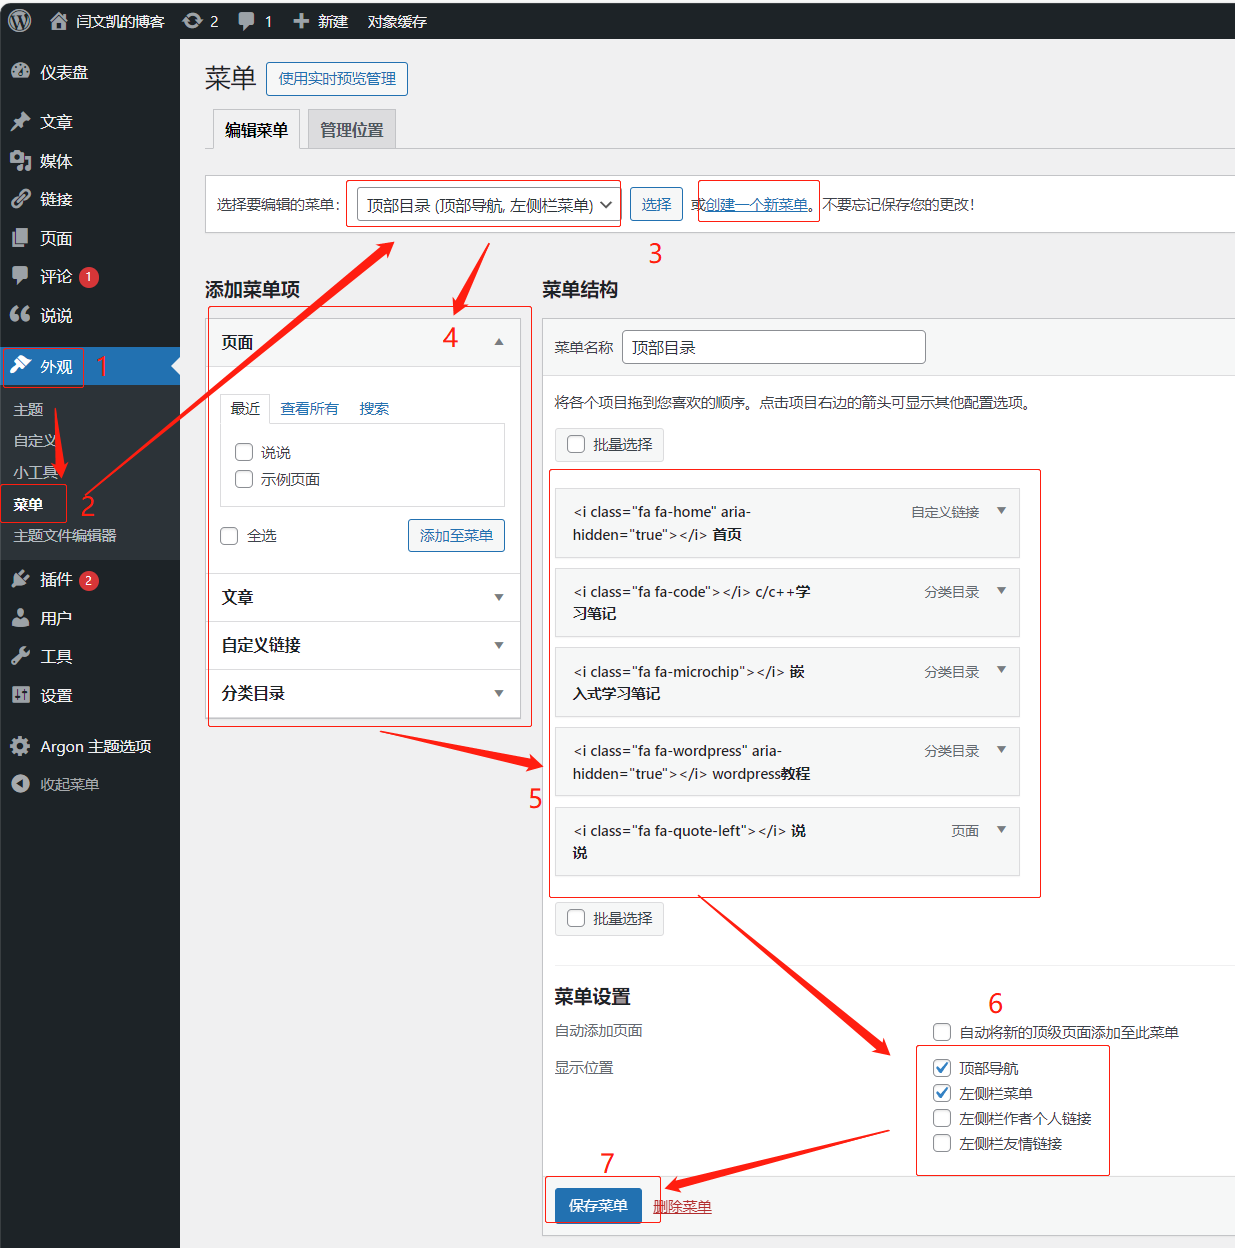
菜单
菜单就是统揽整个博客层级的工具。按照下图步骤,创建一个同时在顶部和左侧显示的菜单目录,在第4步时选择将指定的文章或者网页到对应的分类目录中。最后根据选项添加想要的分类,比如说说、c/c++学习笔记等分类。整体操作繁琐,多试几次就能规划出自己想要的界面了。
插入额外css特效
额外css的功能主要添加全局的特效,我这里主要添加了背景虚化和字体。
背景虚化
添加此特效的目的是为了让用户主要注意力集中在博主内容上,而不是后面精心挑选的美图上,我深以为然,果断加之。
/*日间模式背景透明*/
.card{
    background-color:rgba(255, 255, 255, 0.8) !important;

    -webkit-backdrop-filter:blur(6px);
}
/*夜间模式背景透明*/
html.darkmode.bg-white,html.darkmode .card,html.darkmode #footer{
background\:rgba(66, 66, 66, 0.9) !important;
}
html.darkmode #fabtn\_blog\_settings\_popup{
background\:rgba(66, 66, 66, 0.95) !important;
}

/*小工具栏背景透明*/
.card .widget,.darkmode .card .widget,#post\_content > div > div > div.argon-timeline-card.card.bg-gradient-secondary.archive-timeline-title{
background-color:#ffffff00 !important;
backdrop-filter\:none;
\-webkit-backdrop-filter\:none;
}
.emotion-keyboard,#fabtn\_blog\_settings\_popup{
background-color\:rgba(255, 255, 255, 0.95) !important;
}

body {
background-image: url('');
background-repeat: no-repeat;
background-size: cover; /\* 根据需要调整背景大小 */
background-attachment: fixed; /* 如果需要固定背景 \*/
}
字体
字体这里可以考虑下载自己喜欢的字体,转换成woff2格式(转换地址),放置到自己的服务器的"/var/www/html/字体目录/"下,配合下面这段css放到额外css中即可。
    /*设置网站字体*/
    /*原则上你可以设置多个字体,然后在不同的部位使用不同的字体*/
    @font-face{
        font-family:btfFont;
        src: url(https://www.yanwenkai.com/fonts/700W.woff2) format('woff2')
    }
    body{
        font-family:"btfFont" !important
    }
markdown格式
这个文本编辑器初用时还不适应,用熟练了以后是真香,插入图片整理格式都很方便,搞出一个勉强能看的文章轻轻松松。所以强烈安利并给出几个写文章时需要的小技巧。
超链接
超链接的目的是为了引用别人的网址时可以做到望文生义,而不是显示一长串链接影响观感。
其中:href="":内部填写你的链接。
target="":有以下属性:
_blank: 在新窗口或新标签页中打开链接。
_self: 默认值。在相同的框架中打开链接。
_parent: 在父框架中打开链接。
_top: 在整个窗口中打开链接,忽略任何框架。
rel
noopener: 在新窗口或标签页中打开链接时,不允许被打开的页面访问原始页面的window.opener对象。
nofollow: 告诉搜索引擎不要追踪链接。即使使用了rel="nofollow",浏览器仍然会打开链接。
noreferrer: 在新窗口或标签页中打开链接时,不传递原始页面的Referer HTTP头部。
external: 指示链接是对外部资源的引用。
插入图片
markdown标配的图片插入代码没啥功能,就研究了个css的插入代码,啥都能调整,用着就很舒服了。
//center属性保证图片居中

//width和height控制图片的长宽,最后的斜杠/必须有,否则只能显示图片,但所有效果失效

  注:这两天突然发现,argon中的markdown插件的缺陷,不识别height高度的设置。
插入空格
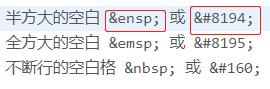
在想要插入空格的地方插入字符串即可,分号千万别省略,它们是一体的。
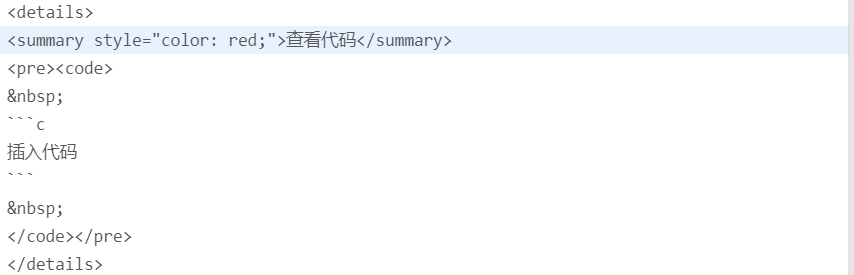
折叠代码块
长代码段很影响整体阅读观感,用此段代码即可折叠代码块,标红可以更醒目。尽量别用,这个会影响css代码的解析。我上面使用这个功能后,发现符号代码在某些情况不会解析出来,显示的还是符号对应的编码。
插入特别标识符
最近编写文档时发现<不被识别,导致代码块中的头文件不显示任何东西;查阅资料发现这个符号是HTML的格式符号,在markdown中一共有三个字符需要特殊处理:<和>及&。<符号用于起始标签,>符号用于终止标签,&符号则用于标记HTML实体,如果你只是想要使用这些符号,你必须要使用实体的形式,像是 < 和 & 。

如下是插入符号后的显示情况:


在网页显示html代码
在写文章时发现在markdown笔记中显示html代码,会出现如下只有代码块没有html代码的问题。
解决方式是使用专门的html格式插入自己想要的代码,而不使用markdown附带的格式。

赞